新公司所有的项目基本上都是使用 react 进行开发,之前的工程师是自己使用 webpack 搭建的项目,因为涉及到的东西不多,而且存在一些问题,已经启用。同时因为项目时间原因没有太多时间自己搭建,而且自己较懒,所以选择了使用 create-react-app 进行项目的开发。
其实开发还是很简单的,主要就是优化的问题,这篇文章主要就是讲关于页面优化的问题,同时也是为了记录一下,避免下次使用的时候在到处找(因为之前写过,最近一次项目又去找之前的配置去了)

问题产生原因
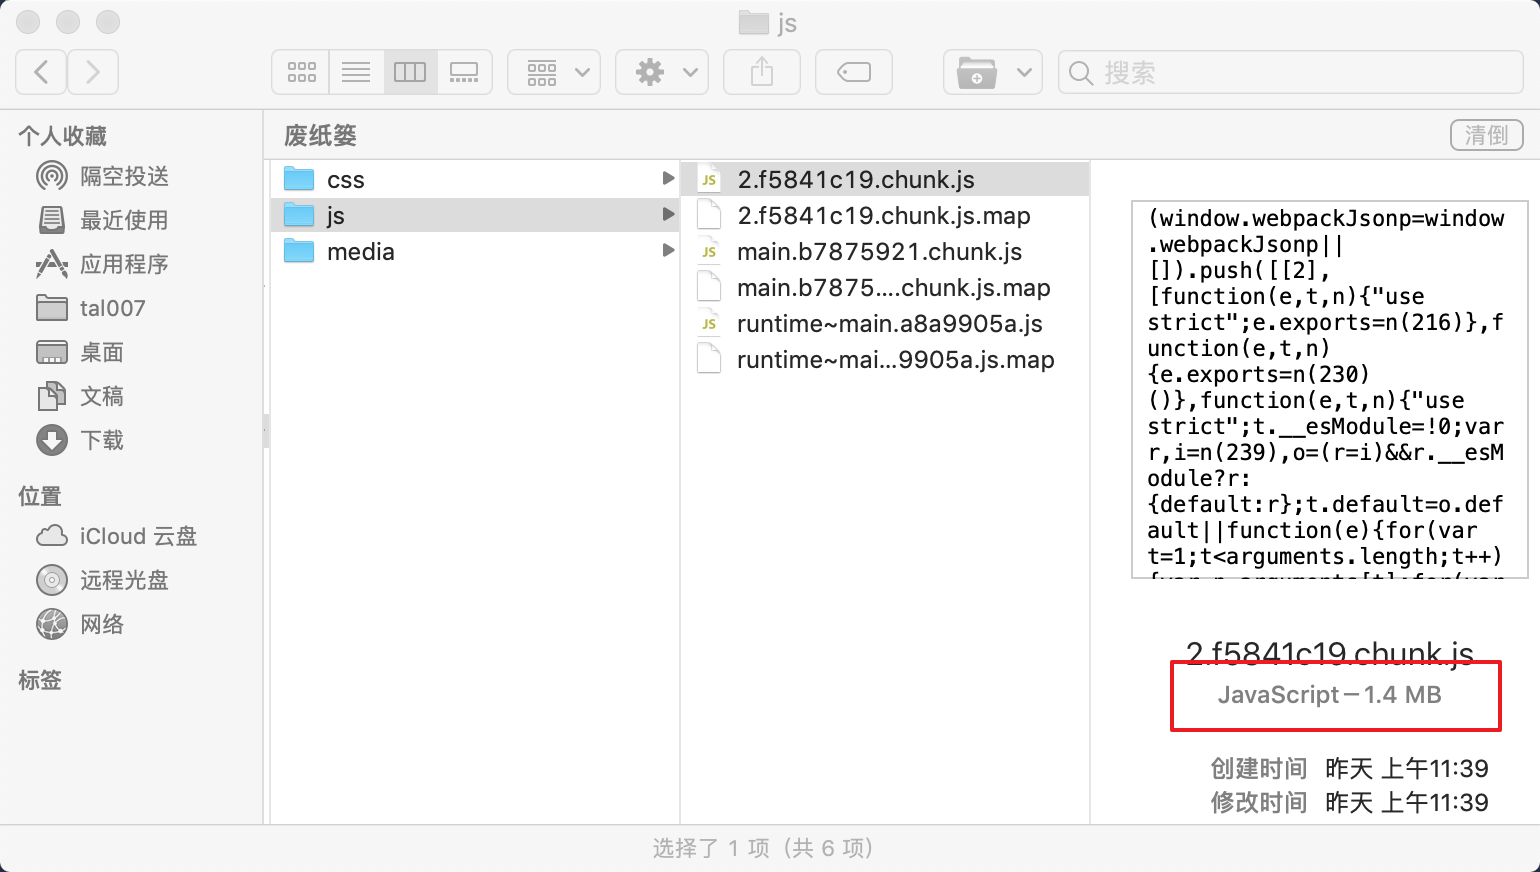
使用 create-react-app 打包项目后,本地运行还可以,但是在服务器上面特别的卡,看了一下文件大小。一个JS文件,打包出来有1.4M的大小

这样大的js可能真的有点大了。包括打包后的CSS文件也有500多KB。这两个文件都很大,用户在访问浏览器请求数据的时候这两个文件请求的时间较长,加上使用react的原意,造成首次加载的时候大部分时间页面是白屏的。这里我们怎么优化呢?
按需加载
第一次看见按需加载这个词的时候是在使用 Ant Design 的时候。获取是因为我比较落后吧,之前一直都不知道这个东西,但是学习永远不要嫌晚,不然你会没有动力的。它里面讲到了为什么要使用按需加载:如果我们在使用一个组件的时候,默认是没有样式的,需要把样式也引用进来才会生效。但是如果你在使用 antd 的时候,用的组件并不多,可是却引入了全部的样式,所以会导致打包出来的文件特别的大。怎么解决呢?如果你使用了 antd ,那么官网上面已经有了很好的说明。
1
| yarn add react-app-rewired customize-cra
|
因为这里讲的是使用 create-react-app 创建的项目,此时我们需要对 create-react-app 的默认配置进行自定义,这里我们使用 react-app-rewired (一个对 create-react-app 进行自定义配置的社区解决方案)。
引入 react-app-rewired 并修改 package.json 里的启动配置。由于新的 react-app-rewired@2.x 版本的关系,你还需要安装 customize-cra。
将默认的 package.json 里面的 scripts 代码修改为一下
1
2
3
4
5
| "scripts": {
"start": "react-app-rewired start",
"build": "react-app-rewired build",
"test": "react-app-rewired test",
}
|
然后在根目录创建一个 config-overrides.js 用于修改默认配置。
1
2
3
4
| module.exports = function override(config, env) {
return config;
};
|
使用 babel-plugin-import
babel-plugin-import 是一个用于按需加载组件代码和样式的 babel 插件(原理),现在我们尝试安装它并修改 config-overrides.js 文件。
1
2
3
4
5
6
7
8
9
10
11
12
13
14
15
16
17
18
19
| const { override, fixBabelImports } = require('customize-cra');
const addCustom = () => config => {
let plugins = []
config.plugins = [...config.plugins, ...plugins]
return config
}
module.exports = {
webpack: override(
addCustom(),
fixBabelImports('import', {
libraryName: 'antd',
libraryDirectory: 'es',
style: 'css',
})
)
}
|
上面的代码经过一些处理,可以添加一部分其他的 Plugin。
antd 官网上面有这样的一段说明
注意:antd 默认支持基于 ES module 的 tree shaking,js 代码部分不使用这个插件也会有按需加载的效果。
所以,在你使用 import { Button } from 'antd'; 这种语法的时候可以不用这个插件。但是如果你是用的是 import Button from 'antd/es/button'; 这种语法,那么就需要了。同时可以不用引入整个CSS静态文件了。
路由懒加载
使用react开发一般使用的路由模块都是react-router-dom这个插件。当然,如果你使用其他的插件,我想应该也是可以的,不过具体的用法可能需要你自己探索。
正常情况下在使用路由的时候,你多半是按照下面的代码进行配置的
1
2
3
4
5
6
7
8
9
10
11
12
13
14
15
16
17
18
19
20
21
22
23
24
25
26
27
28
29
30
31
32
33
34
35
36
37
| import React, {Suspense } from 'react'
import { BrowserRouter, Route } from 'react-router-dom'
import { Loading } from '../components/common'
import Home from '../components'
import Download from '../components/download/'
import Login from '../components/login'
import Prize from '../components/prize'
import News from '../components/news'
import NewsDetail from '../components/news/detail'
import Support from '../components/support'
import Me from '../components/me'
import Pay from '../components/pay'
const App = () => (
<BrowserRouter basename='/'>
<Route path='/' exact component={Home} />
<Route path='/download' exact component={Download} />
<Route path='/prize' exact component={Prize} />
<Route path='/news' exact component={News} />
<Route path='/news/detail' exact component={NewsDetail} />
<Route path='/support' exact component={Support} />
<Route path='/me' component={Me} />
<Route path='/pay' component={Pay} />
<Login />
</BrowserRouter>
)
export default function Main() {
return (
<Suspense fallback={<Loading />}>
<App />
</Suspense>
);
}
|
这种写法也是官网上面的写法。这样写可以,但是有一个问题,就是上面的所有引入也会直接打包在 bundle.js 里面,导致整个js与CSS特别的大。这里我们可以做路由的懒加载:即这个路由页面在使用到的时候在进行引入加载,而不是一开始就加载。有点类似于上面所说的按需加载
修改于 2019年11月14日
react 16.8 已经提供 React.lazy 方法实现路由懒加载。
1
2
3
4
5
6
7
8
9
10
11
12
13
14
15
16
17
18
19
20
21
22
23
24
25
26
27
28
29
30
31
32
33
34
35
36
37
38
39
40
41
42
43
44
45
46
47
48
49
50
51
52
53
54
55
56
57
58
59
60
61
62
63
64
65
66
67
68
69
70
71
72
73
74
75
76
77
78
| import React, {Suspense } from 'react'
import { BrowserRouter, Route } from 'react-router-dom'
import { Loading } from '../components/common'
+ const Home = React.lazy(_ => import('@pages/home'))
+ const Download = React.lazy(_ => import('@pages/download/'))
+ const Login = React.lazy(_ => import('@containers/Login/SetIsShowLoginModal'))
+ const Prize = React.lazy(_ => import('@pages/prize'))
+ const News = React.lazy(_ => import('@pages/news'))
+ const NewsDetail = React.lazy(_ => import('@pages/news/detail'))
+ const Support = React.lazy(_ => import('@pages/support'))
+ const GameRoom = React.lazy(_ => import('@pages/GameRoom'))
+ const Me = React.lazy(_ => import('@pages/me'))
- const Home = asyncComponent(() => import('../components'))
- const Download = asyncComponent(() => import('../components/download/'))
- const Login = asyncComponent(() => import('../components/login'))
- const Prize = asyncComponent(() => import('../components/prize'))
- const News = asyncComponent(() => import('../components/news'))
- const NewsDetail = asyncComponent(() => import('../components/news/detail'))
- const Support = asyncComponent(() => import('../components/support'))
- const Me = asyncComponent(() => import('../components/me'))
- const Pay = asyncComponent(() => import('../components/pay'))
-
- function asyncComponent(getComponent) {
- return class AsyncComponent extends React.Component {
- static Component = null;
- state = { Component: AsyncComponent.Component };
- componentDidMount() {
- if (!this.state.Component) {
- getComponent().then(({ default: Component }) => {
- AsyncComponent.Component = Component
- this.setState({ Component })
- })
- }
- }
-
- componentWillUnmount() {
-
- this.setState = (state, callback) => {
- return;
- };
- }
- render() {
- const { Component } = this.state
- if (Component) {
- return <Component {...this.props} />
- }
- return null
- }
- }
- }
const App = () => (
<BrowserRouter basename='/'>
<Route path='/' exact component={Home} />
<Route path='/download' exact component={Download} />
<Route path='/prize' exact component={Prize} />
<Route path='/news' exact component={News} />
<Route path='/news/detail' exact component={NewsDetail} />
<Route path='/support' exact component={Support} />
<Route path='/me' component={Me} />v
<Route path='/pay' component={Pay} />
<Login />
</BrowserRouter>
)
export default function Main() {
return (
<Suspense fallback={<Loading />}>
<App />
</Suspense>
);
}
|
上面编写了一个一步加载路由的方法 asyncComponent。方法接收一个函数,这个函数可以从上面的引入看到,是返回一个 import 的函数。import 'XXX' 最后返回的是一个Promise,所以下面使用了 .then() 方法。之后就是修改这个组件了。不过需要注意的是
1
2
3
4
5
6
7
| render() {
const { Component } = this.state
if (Component) {
return <Component {...this.props} />
}
return null
}
|
render 中如果 Component 是null。即还没有引入的时候,返回的是一个null
因为返回一个null,所以会有一个闪屏,第二次加载的时候就没有了。这里可以做一个Loading。不过想过可能不大,或者说设置一个定时器延时修改Component状态,或许效果就不那么明显了。这个这样做的好处就是可以把异步加载的这些组件的js以及CSS单独的打包出来,这样就不用一次加载过大的js文件了。
这也和之前讲到的桌面浏览器前端优化策略中说到的消除阻塞页面渲染的CSS以及Javascript和避免运行耗时的 Javascript中说到的相符合。
使用SSR渲染
使用SSR渲染不仅可以对SEO优化有一定的帮助,同时,还可以对react项目首屏优化的项目有一定的优化作用,所以,如果有需要,可以采用SSR渲染的模式进行开发。关于SSR渲染你可以自己在create-react-app项目中写同构应用,也可以使用现有的服务端渲染的框架,如 nextjs等。这里不做过多说明。
补充 2019-07-16 10:00:54
webpack 提取公共代码
webpack打包自带了提供公共代码的功能,在webpack 3中可以使用 CommonsChunkPlugin 进行公共代码的提取,使用方式如下:
1
2
3
4
5
6
7
8
|
new webpack.optimize.CommonsChunkPlugin({
name:'vender',
minChunks: function (module) {
return module.context && module.context.includes('node_modules');
}
})
|
具体的使用可以查看 https://webpack.js.org/plugins/commons-chunk-plugin/
上面的是 webpack 3 的使用方法。在 webpack 4 中,配置发生了改变。
在 webpack 4 中,提取代码不在放在 plugin 数组下面,而是单独成为了一个属性(与plugin同级了)。
1
2
3
4
5
6
7
8
9
10
11
12
13
14
15
16
17
18
19
20
21
22
23
24
25
26
27
28
29
30
31
32
33
34
35
36
37
38
39
40
41
42
43
44
45
46
47
48
49
50
51
52
53
54
55
56
57
| optimization.splitChunks = {
- cacheGroups: {
-
- common: {
- name: "common" ,
- chunks: "all" ,
- minSize: 1 ,
- priority: 0
- } ,
-
- vender: {
- name: "vendor" ,
- test: /[\\/]node_modules[\\/]/ ,
- chunks: "all" ,
- priority: 1 0
- }
- } ,
+ cacheGroups: {
+ vendors: {
+ test: /[\\/]node_modules[\\/]/,
+ name: 'vendors',
+ minSize: 50000,
+ minChunks: 1,
+ chunks: 'initial',
+ priority: 1,
+ },
+ commons: {
+ test: /[\\/]src[\\/]/,
+ name: 'commons',
+ minSize: 50000,
+ minChunks: 2,
+ chunks: 'initial',
+ priority: -1,
+ reuseExistingChunk: true,
+ },
+ antdDesign: {
+ name: 'antd-design',
+ priority: 20,
+ test: /[\\/]node_modules[\\/]@ant-design[\\/]/,
+ chunks: 'all',
+ },
+ lodash: {
+ name: 'lodash',
+ priority: 20,
+ test: /[\\/]node_modules[\\/]lodash[\\/]/,
+ chunks: 'all',
+ },
+ reactLib: {
+ name: 'react-lib',
+ priority: 20,
+ test: /[\\/]node_modules[\\/](react|react-dom|react-router-dom)[\\/]/,
+ chunks: 'all',
+ },
+ },
}
|
cacheGroups 下面添加你要提取的代码的属性,vender 一般提取的就是 node_modules 目录中的js代码,而且node_modules中插件的版本不会轻易的变化,这样,这个 vender 就可以一直缓存在浏览器中,除非特殊情况发生。你可可以添加其他的,有限打包权使用priority区分就行,权重越高,越优先打包。具体的其他的属性配置查看https://webpack.js.org/plugins/split-chunks-plugin/
关于cacheGroups的理解可以看 理解webpack4.splitChunks之cacheGroups
使用 webpack-bundle-analyzer
使用 webpack-bundle-analyzer 对现有项目打包文件进行分析
安装 webpack-bundle-analyzer 插件
1
| yarn add -D webpack-bundle-analyzer
|
使用就直接在 plugin 中添加插件使用即可
1
2
| const BundleAnalyzerPlugin = require("webpack-bundle-analyzer").BundleAnalyzerPlugin;
new BundleAnalyzerPlugin();
|
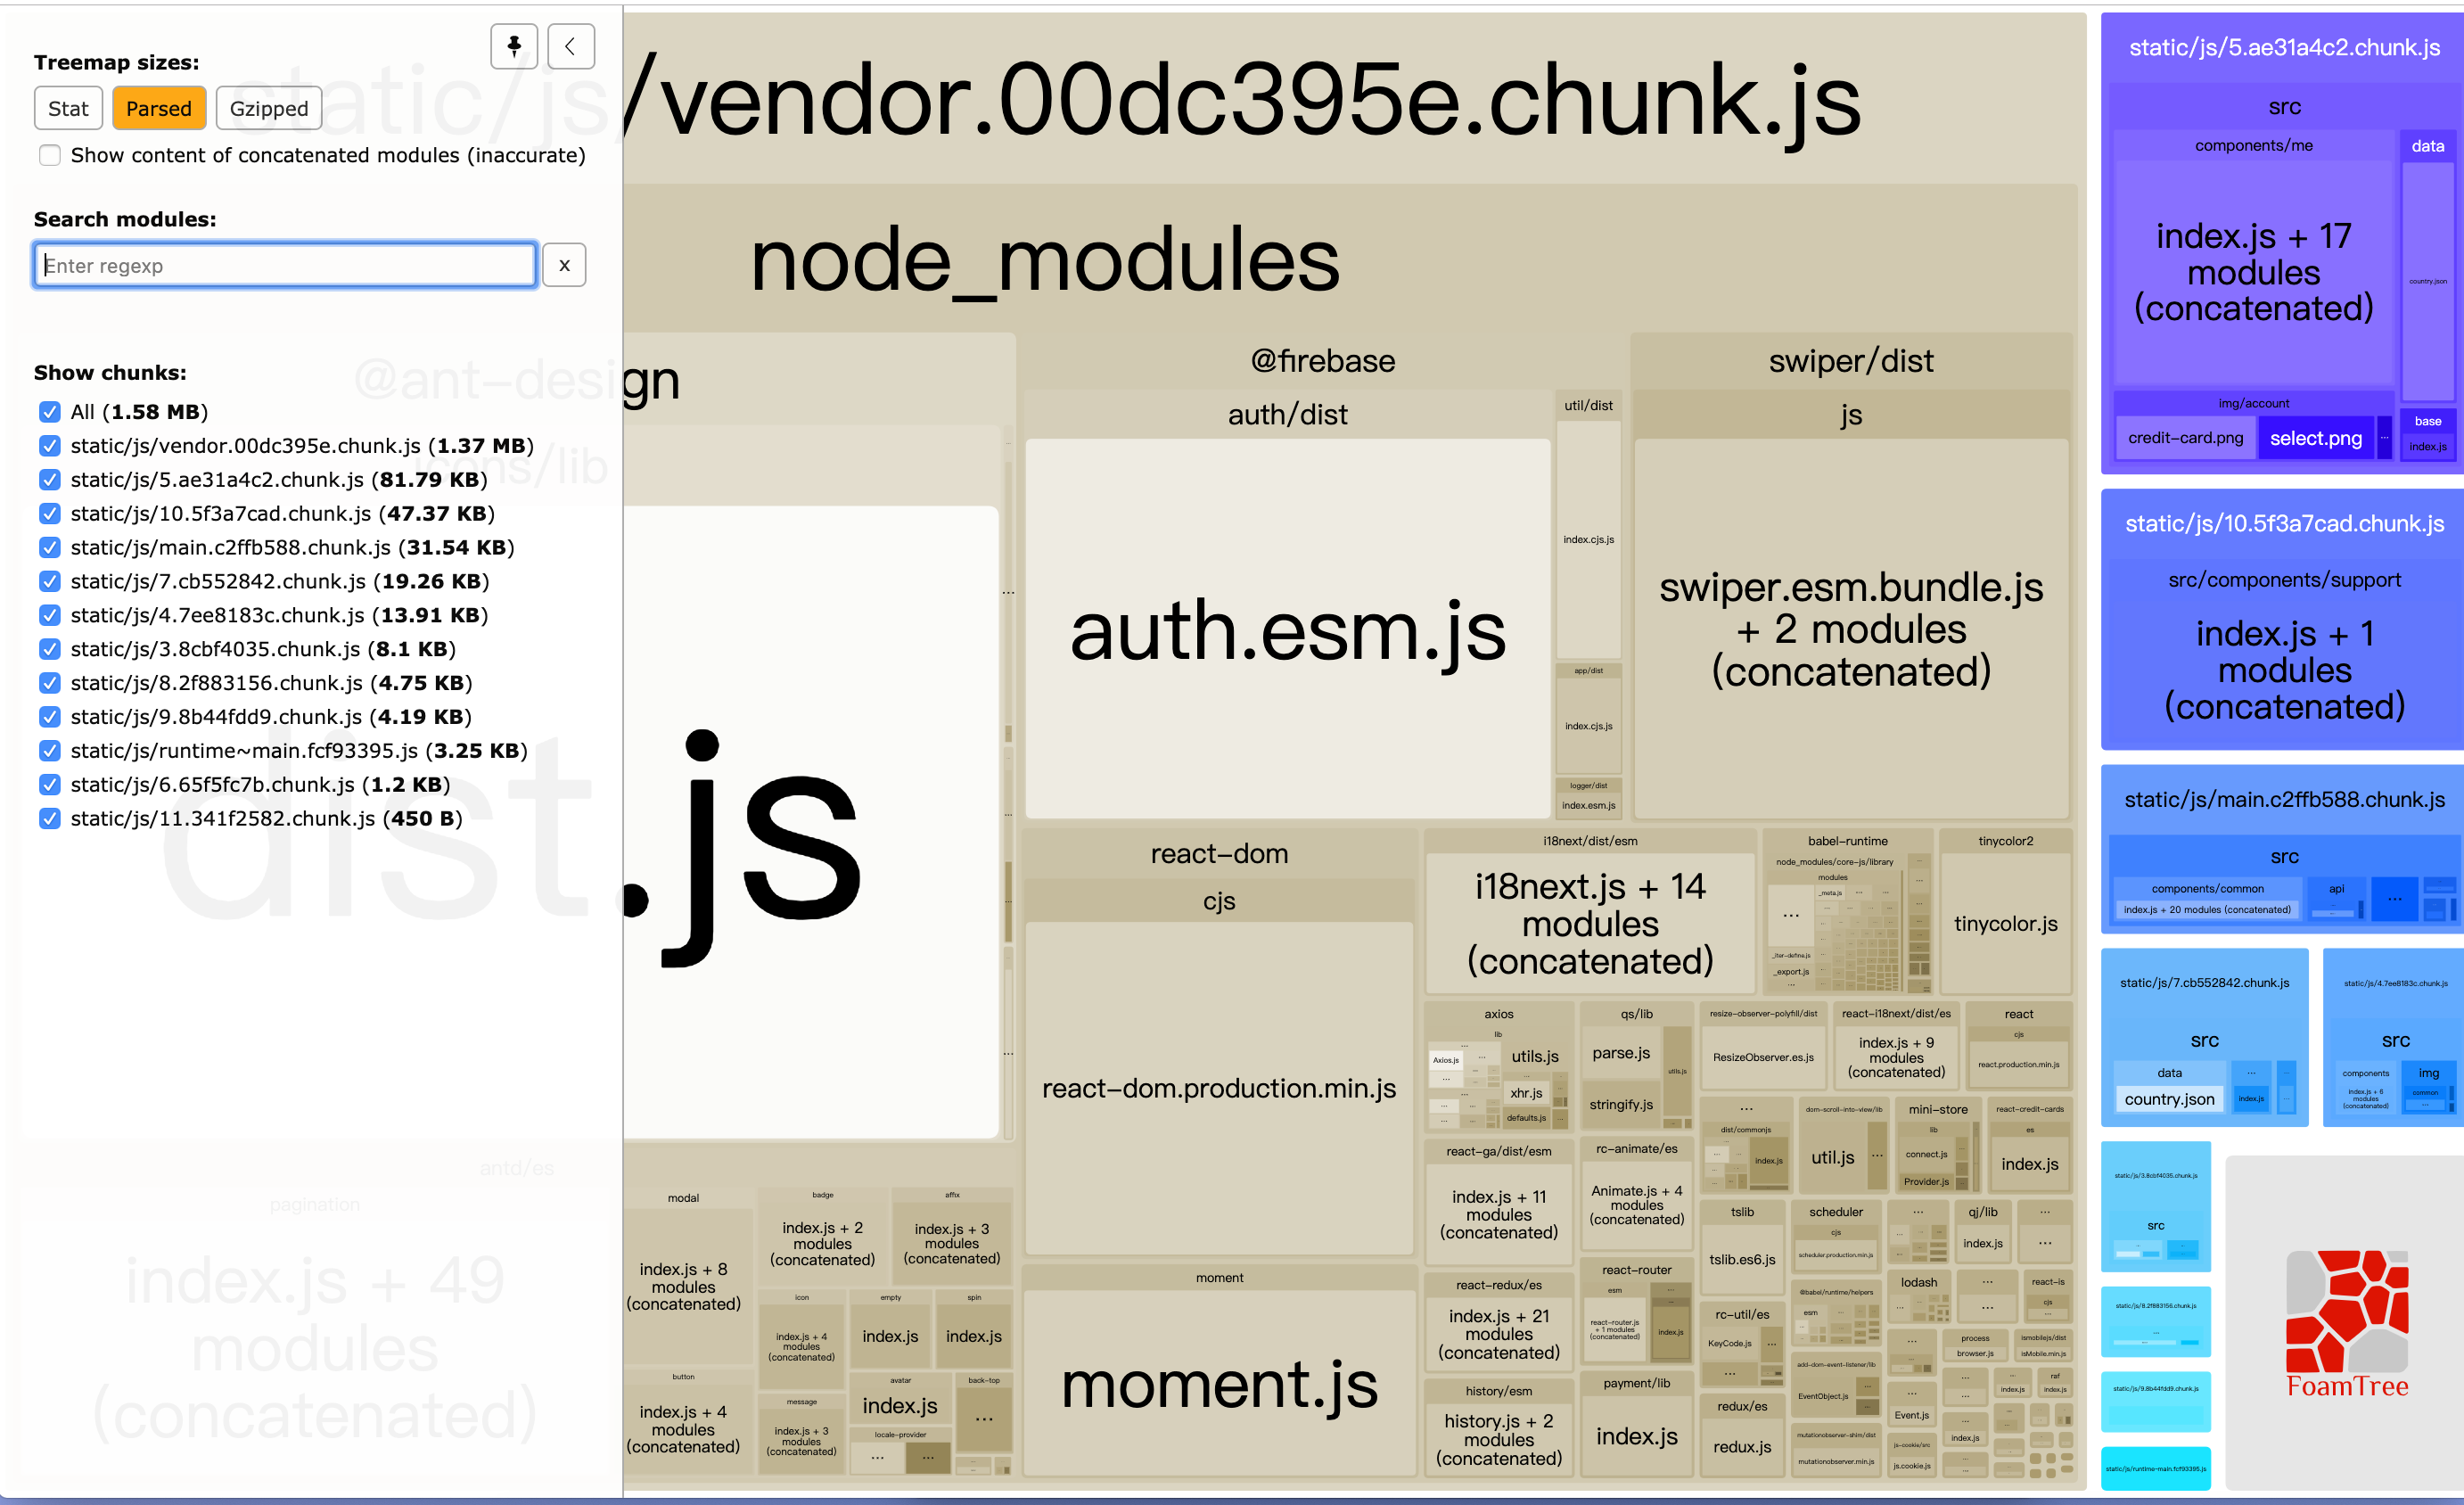
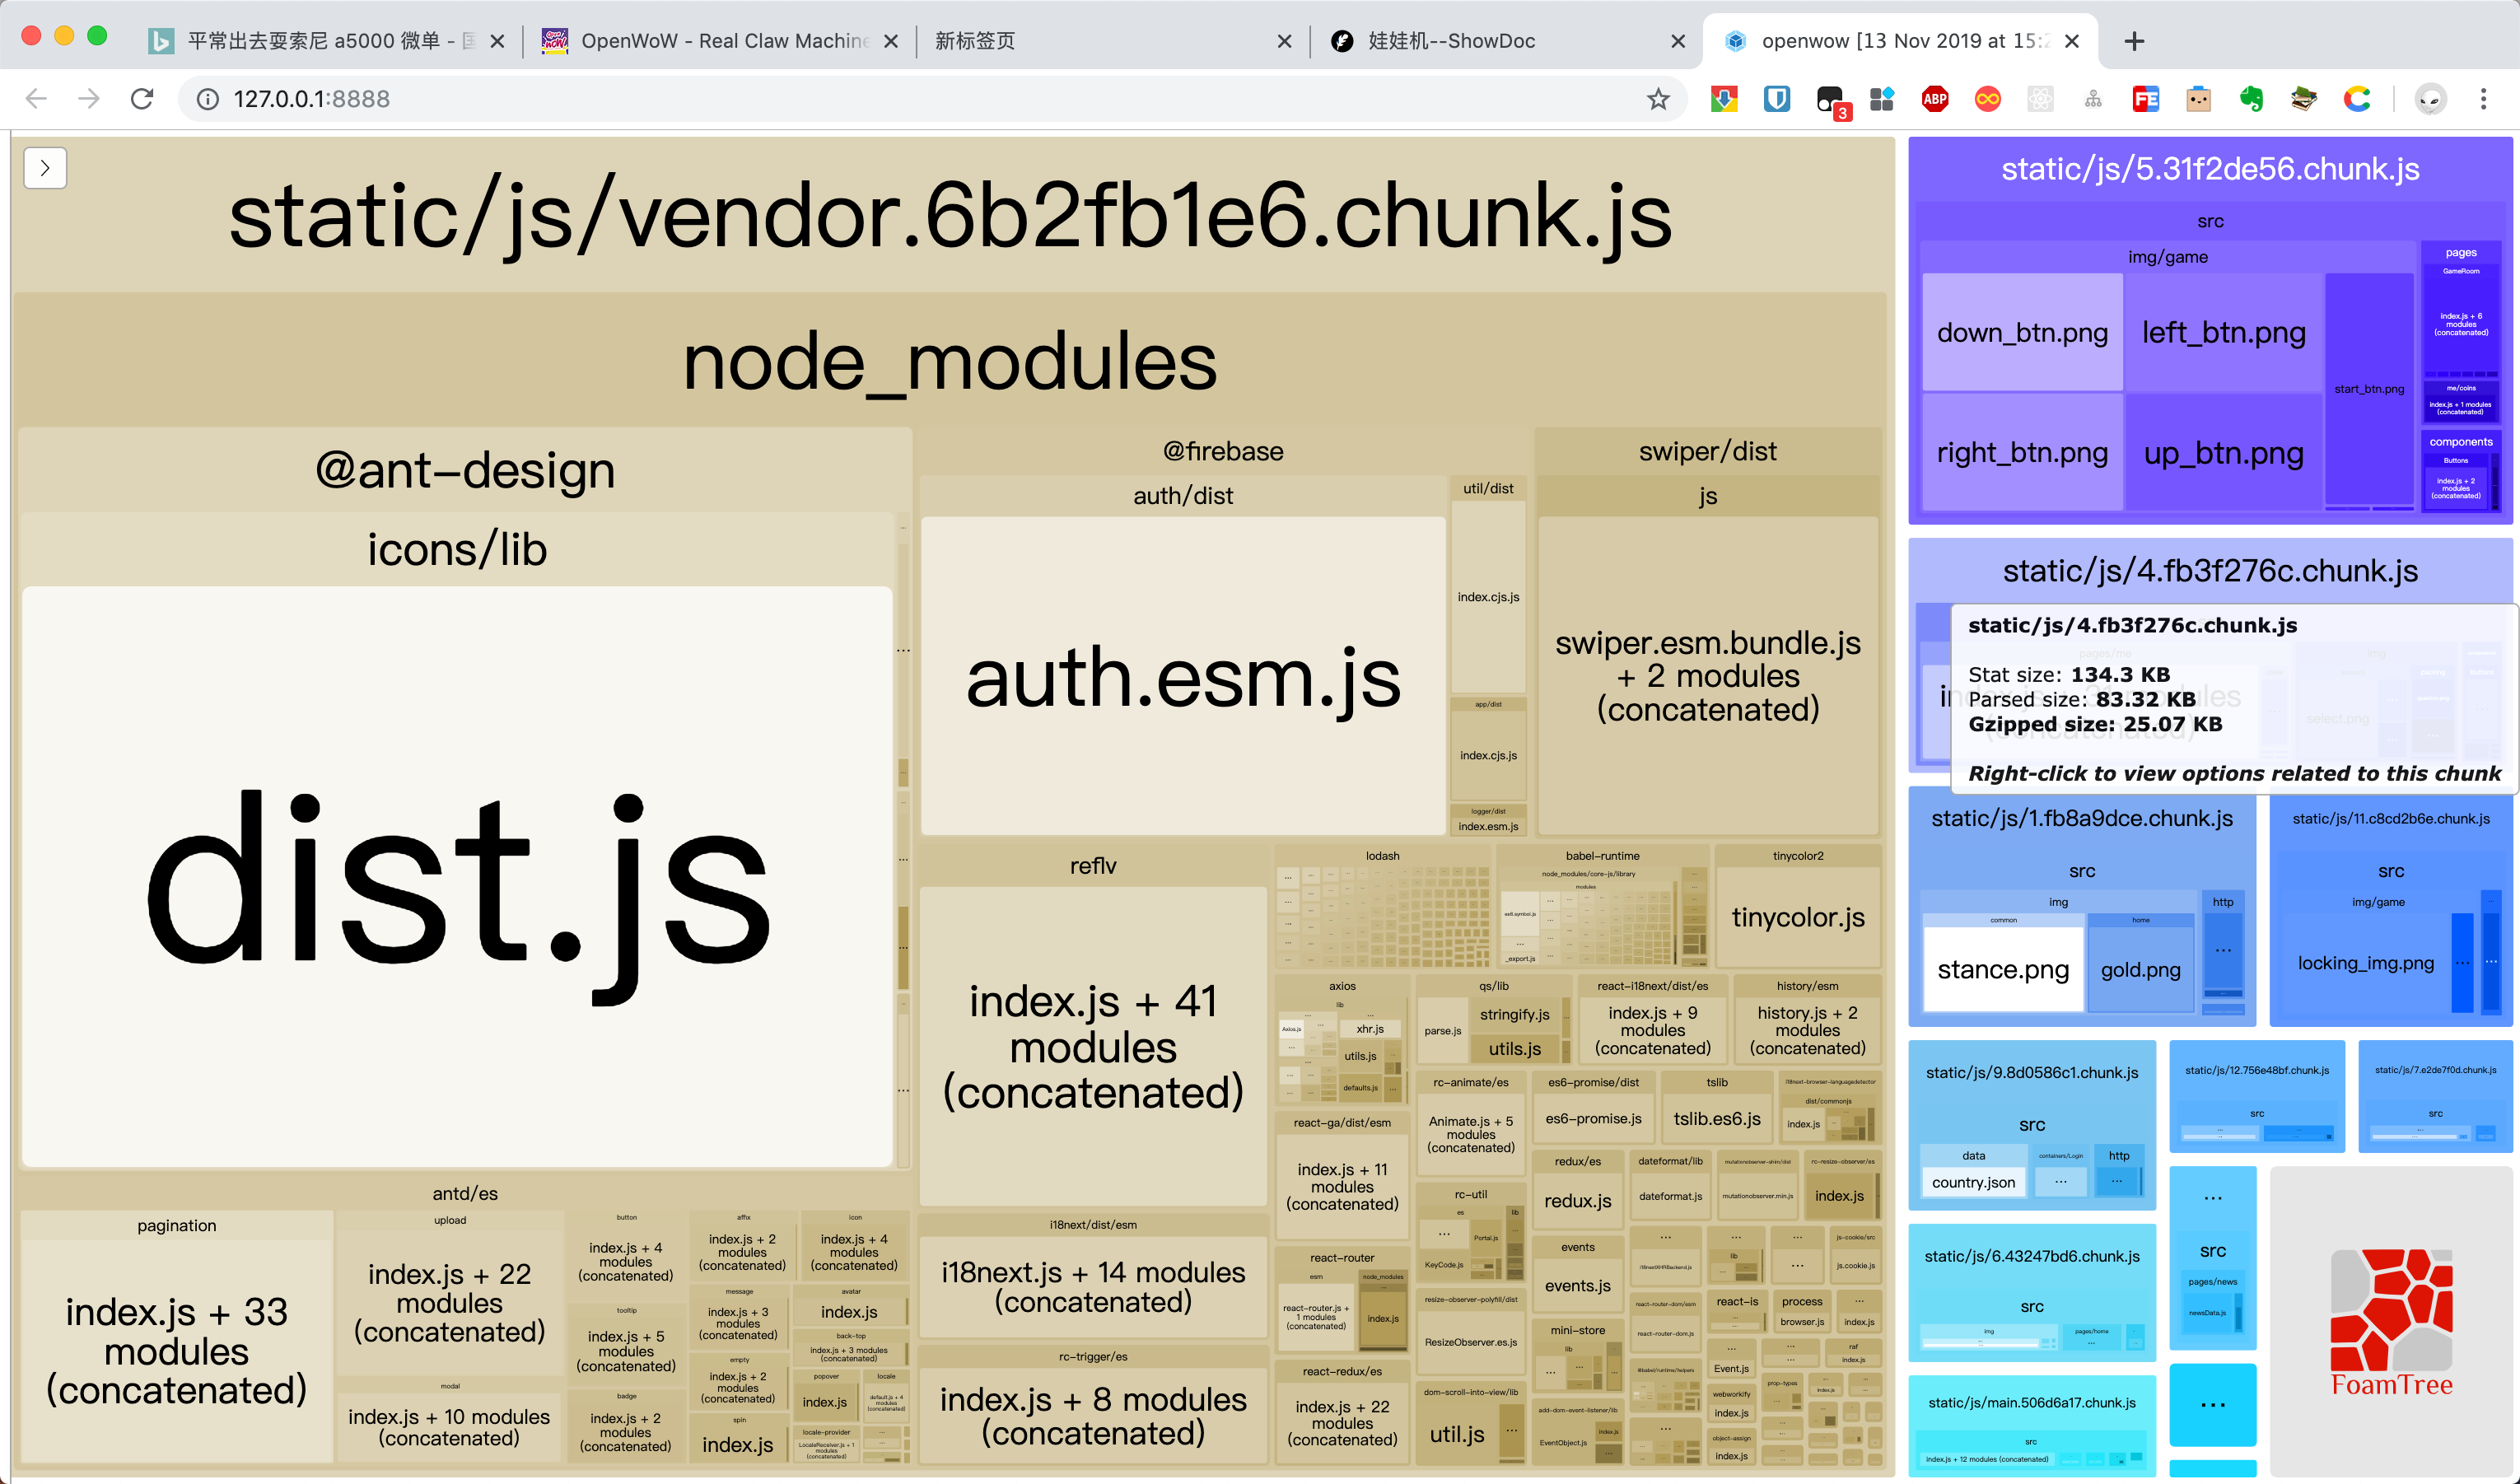
打包后你会看到如下分析图

如果有过大的文件,可以继续进行拆分
补充 2019-11-13
大型库外链
通过上面的打包后的分析图可以看出来总的大小是1.58M,vendorjs是1.37M。其他的都是几十K,如果是通过gzip压缩,那么大小在合理的范围内。但是那个1.37M的就过于庞大了。这时候在看看图上面。大的区域有
- ant-design
- firebase
- react-dom
- swiper
- momentjs
- etc……
这个时候,可以将一些大型库外链。即通过script的方式引入这些库。
webpack 提供了一个属性 externals 可以配置我们需要外链的库
1
2
3
4
5
6
7
8
9
| if (process.env.NODE_ENV === 'production') {
...
config.externals = {
"react": "React",
"react-dom": "ReactDOM",
"Swiper": "swiper"
}
}
|
这里我配置了外链react,react-dom,swiper三个库
1
2
3
4
| <script crossorigin src="https://unpkg.com/react@16/umd/react.production.min.js"></script>
<script crossorigin src="https://unpkg.com/react-dom@16/umd/react-dom.production.min.js"></script>
<script src="https://cdn.bootcss.com/Swiper/4.5.0/js/swiper.min.js"></script>
<link href="https://cdn.bootcss.com/Swiper/4.5.0/css/swiper.min.css" rel="stylesheet">
|
注意,是打包的时候添加外链,externals 属性与entry,output属于同级。
这样处理后,打包就不会把需要外链的库打包进去

至于 ant-design ,因为配置了按需加载,可以不用使用外链。
合理使用第三方模块
上面看到有一个momentjs还是挺大的。但是我的项目中使用momentjs就是用来处理了时间格式,仅仅是着一个小功能就用这样大的一个库,确实是有一点过分了。所以合理的选择第三方库也是一个优化办法。最终我把 momentjs 替换成了 dateformat
1
2
3
| 补充于2020年4月23日16:54:45
momentjs 可以 替换成 [dayjs](https://github.com/iamkun/dayjs)
|
这样处理后,既解决了问题,有减少了不必要的处理。
使用 HappyPack 和 DllPlugin
这个方法我这里还没有试过,不过网上有很多这方面的博客,需要的可以去google。以后用到了在进行补充
现成 webpack+antd+react 的架子(补充于2020-4-23 16:59:20)
写了一个 webpack+antd+react 的架子,可以查看 react+antd+webpack4 构建项目框架 。不断完善中……


